Disclosure: Some posts contain affiliate links, which earn us a commission if you make a purchase through them. Positive Fishing © participates in various affiliate networks including the Amazon Services LLC Associates Program.
As a fisherman and gardener, I have a keen interest in worms. Setting up a DIY wormery in your garden both for fishing use and to improve your garden soil would give you an easy supply throughout the year.
Every angler uses worms at some time during their fishing trips. But purchasing them from the tackle shop or bait store can be expensive. Alternatively, you can go out to the garden, collect worms from the wet grass in the early morning or dig them up, but both are time-consuming tasks.
All keen gardeners know the soil benefits from the worm castings and the compost. So there are two fantastic benefits for the angler and the gardener!
This article will introduce the best three wormery options for gardeners and anglers.
- Single Bin DIY Wormery – Basic Option
- Three Bin DIY Wormery – Intermediary Option
- Purchased Wormery – Advanced Option
So, let’s learn more about worms and the best wormery options.
Where Is The Best Place For A Wormery?
Worms can be grown anywhere, but the weather greatly impacts the successful raising of worms. Worms have a better chance to flourish in your bins if kept between a temperature of 50–80 °F (10–27 °C).
Outdoors Wormery
Building an outside wormery is most people’s choice. Always choose a shady spot away from direct sunlight. Ideally, the temperature should be no more than 27 deg C. Try to avoid areas where continuous rainfall may flood the wormery.
Worms don’t like freezing temperatures and hot weather, so choose the location in your backyard carefully to suit the year-round.
The best spot is generally in the corner of the garden, away from the house if possible.
Inside Wormery
A garage or shed is perfect if you prefer to keep it indoors. There is significantly less impact due to drastic weather changes such as frost, rain, and heat waves when it’s indoors.
Don’t put the wormery inside your house! Some may escape from the bin, and the house will have some very strange smells. The worm casts are, in fact, “worm poop”
Indoor or Outdoor wormery will provide a good supply of worms throughout the year.
What is Needed To Make A DIY Wormery?
To make a simple bin wormery, you’ll need the following essential items:
One (1) large plastic bin or container with a lid (Single Bin Wormery – Basic Option)
OR
Three Identical (3) large plastic bins or containers with a lid (Three Bin wormery – Intermediary Option
- A hand drill and a 3mm and 5mm drill bit
- 4 bricks or pieces of wood to act as a stand
- Lots of sheets of newspaper and cardboard
- Compost for option 1
- Food scraps
- And of course…… Worms!
1. Making Your Own Single Bin DIY Wormery – Basic Option
Single bin wormery is simple to set up and is best using a rectangular plastic box rather than a round bin. A box of 50cm Long x 35cm Wide and 35cm Deep is perfect, but the size can vary if you do not have exactly this size available.
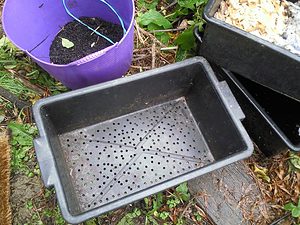
Step 1 – Drill 5mm holes in the base of the bin.
Step 2 – Drill 5mm holes in the sides of the bin, more towards the top.
Step 3 – Support the bin in the four corners using house bricks. The holes at the bottom of the bin need to be clear from the bricks to promote better airflow.
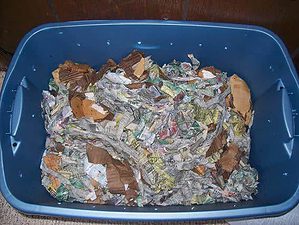
Step 4 – Place several sheets of newspaper in the bottom of the box, covering the holes. This is to prevent the worms from escaping the box.
Step 5 – Drill as many 5mm holes in the lid as possible. Again, this ensures enough airflow for the worms to breathe and the food to decompose faster.
Step 6 – Cover the newspaper with approximately one to two inches of bedding. The bedding can be any compost you have around the garden or bought from a garden shop.
Tip: The compost bedding should be damp; worms like a warm damp habitat.
Step 7 – Add your store-bought worms to the box; around 250 will be needed for a bin the size I used.
Tip: Obviously, adding more worms will result in a faster reproduction process.
Step 8 – Throw in your food waste per the recommended types. Try to cut the food into smaller pieces, if possible, to help speed up the digestion process for the worms. Lastly, make sure to top up additional newspaper and place a larger piece of cardboard over the top to reduce the light.
Step 9 – Place the lid on top securely, and that’s it – it’s ready to start the process!
2. Making Your Own Three Bin DIY Wormery – Intermediary Option
What Bin Or Container Should I Use?
For most wormeries, three 45 liters (10 Gallon) containers each is perfect. You can use round or rectangle-shaped bins. If your garden is big and you use a lot of compost, double up to six bins. Just scale it according to your needs. Three bins are more than enough to produce enough worms for fishing.
Any plastic storage bins you can get from the hardware store or supermarkets will work fine. Make sure that each bin has a well-fitting lid.
Tip: Any bin color works, but a black or darker bin will shield the light better from the worms.
How To Drill Holes At The Bottom Of The Wormery Bin?
Holes in the plastic bin are required for the worms to breathe. Drill 5mm holes with a spacing of approximately 25mm apart in TWO of the bins.
The purpose of these holes is to allow the moisture to flow through the bottom of the top two bins. DO NOT DRILL any holes in the BOTTOM of the THIRD bin.
How To Drill Holes At The Sides And Lid Of The Bin?
Air needs to penetrate the bins to help break down the food faster.
Using only the two buckets from step one, drill 3mm holes around the sides of the bin. Keep the holes 25mm apart and go around the top part nearest the rim to a depth of 150mm.
For the bin lid, drill as many holes as possible using a 3mm drill bit. As a general guide, approximately 25mm apart is a good rule of thumb.
Stack Up The Bins
Place one of the drilled bins inside the bin without any holes drilled.
Add around 100mm of damp torn-up newspaper into the bin and some scrap food; lastly, add the worms of your choice. Check out my section below on the number of worms to add.
Tip: You can drill more holes (or bigger holes) on the sides nearer to the top of the bin since the worms will remain nearer to the base and not escape.
Place the lid on top of the Bin
Lastly, put the lid on the top bin, and the worms will start to digest the scraps and convert them into compost.
Once the food starts to reduce, top-up as necessary to the same level as before.
Tip: To make this wormery work efficiently, check the worms once every 3 or 4 days. Make sure to top up food scraps to the correct level.
Add the Third Bucket
Once the food starts to reduce, put the third bin into the second bin. Make sure to add new food and bedding to the third bin and replace the lid on top of the third bucket.
As the worms complete the digestion of the food from the second bucket, the worms will naturally search and move up to the third bin for the new fresh food and bedding.
Collecting the Compost
Once the worms move up to the uppermost bin, the compost from the second bucket can be removed and placed in the garden. This will usually take a minimum of 3 months.
Finally, Repeat the Process
As the second bin completes the process of creating the compost, remove the bin and its compost and move the empty bin to the top and add newspaper and food scraps. Worms again will migrate to the new bin.
This process of switching between the two bins continues through the year – emptying completed compost and adding fresh food and newspaper bedding. The frequency will depend on the quantity and type of worms you use.
Tip: The lowest bucket will collect some liquid, known as “compost tea.” It is great to add directly to your garden plants for feed. A lot of smell will come from this bucket, so make sure it is emptied regularly.
Should I Buy A Ready Made Wormery or a DIY Wormery?
Deciding to purchase a ready-made wormery is not a cheap investment. Whilst they are designed as a fully functional drop-in option, they take away some of the fun of creating your own DIY version.
This may be a better option if you prefer to save a little time and want a neater professional look.
3. Purchasing Your Wormery – Advanced Option
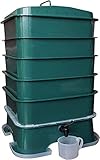
This dark green VermiHut 5 Tray worm compost bin ready is a great design with some nice additional benefits.
Features:
- A larger version of the DIY worm compost bin produces more worms.
- It comes with a standard 5 trays, but more trays can be added at any time.
- The Lid has a handle for easy removal.
- It incorporates an additional airflow function called an M-board to increase compost efficiency. Airflow is an important factor in reducing worm loss.
- It has an additional odor removal lid function called a V board lid, which helps moisture control and fruit fly control
- Integrated Ant trap function to prevent ants from getting into the base and the vermicomposter.
- The bottom tray has a tap with a lever to drain off the compost tea.
- It also comes with accessories, a guide, and an instruction manual.
Tip: It’s easier to use a rectangle tray rather than a round bin when building a stacked version. Trays fit nicely on each other and are simple to move around.

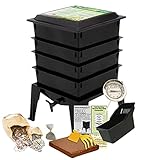
An alternative to the VermiHut 5 tray system is the Worm Factory 360 black composting system. This impressive system is made in the USA and is the largest available option, and is expandable to up to six trays. It’s perfect for recycling food waste at home and producing a lot of worms!
What are The Best Worms to Raise In The Wormery?
Earthworms do not work as well in a vermicomposter. The Red wigglers (Eisenia fetida) and Red Worms (Lumbricus rubellus) are the best for vermicomposting purposes.
Composting worms are far superior at breaking down food fast and creating more compost than earthworms. Earthworms are much more effective at breaking down food that is already decomposed.
If you are only vermicomposting and not collecting worms, go with redworms or red wigglers. However, if you are a fisherman and want to use the worm composter for all types of worms, including earthworms (lobworms) for fishing, you can still introduce them. Most anglers will opt for the nightcrawlers, and the dendrobaenas are the go-to worm bait for every species – so these should always be part of your vermicomposter!
The best worms to use in a vermicomposter are:
- Red Wigglers/Tiger Worms (Eisenia fetida)
- European Nightcrawler/Redworms (Eisenia hortensis or Dendrobaena Veneta)
- Earthworms (Lumbricus Terrestris)
Red wigglers (Tiger worms) are the smallest and, as the name suggests, red in color. Red wigglers can grow very fast, and the European Nightcrawlers (Dendrobaenas) are the largest.
Whether you raise, Red Wigglers or European Nightcrawlers are both great as fishing bait and excellent worms for producing compost.
If you wish, all three can be kept together in one wormery.
What Worms Should You Not Put In A Vermicomposter?
Alabama jumpers are the worst worms to put in a vermicomposter. They eat large amounts of leaves, so you spend more time managing the composter; they also require a little more special consideration over the redworms and nightcrawlers. Jumpers’ reproduction rate is less than red worms, similar to African night crawlers.
If you are starting worm composting for the first time, stick to the redworms or nightcrawlers to make things easier. Then try the Alabama jumpers later.
How Many Worms Do I Add to the Wormery?
Red Wigglers – Place around 30 to 50 worms per square meter.
European Nightcrawlers – Place around 10 to 20 worms per square meter.
Earthworms – Due to their larger size, only 5 to 10 worms per square meter are required; remember, these are the deep burrowing worms.
What Are The Best Food Scraps For Worms?
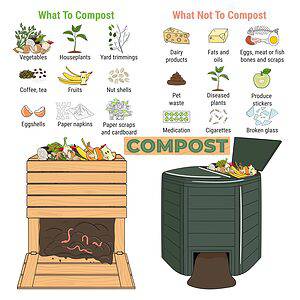
For an outside wormery, you can refer to the image above. If you plan an inside wormery, you have restrictions due to the smell of rotting vegetables, etc. Cabbage and onions smell quite bad, so if the wormery is in a non-ventilated area, you may get complaints from the rest of the family!
Tip: Worms are ravenous; using a vermicomposter, they can eat up to half their weight in food daily!
How Long Does It Take Worms To Grow In The Wormery?
Once your wormery is completed, it will take worms around 3 to 6 months to become large enough to either add to your garden or to be used for fishing bait.
Tip: If you do find any dead worms, always pick them out and throw them away. Some will die during the process.
What Is Vermicomposting?
Vermicomposting is the name given to worm composting. Worms digest food, and the waste is converted to organic garden compost.
What Are The Benefits of Worms In Your Garden?
Worms digest organic matter, such as leaves, dead plants, etc., which are left on the ground. Once the worms have digested it, then it is deposited back as “worm casts”
Worms burrow around in the soil and your garden plant roots; this allows air and moisture into the soil for plants to grow efficiently.
After a few months, this organic fertilizer compost can be spread around the garden. Since the soil is rich in nutrients, plants grow much healthier, and it also helps prevent plants from diseases and insect attacks.
Final Thoughts
Whether you’re an angler or gardener or both, wormeries can save time and money and be fun at the same time.
Once the wormery is built, there is minimal investment and time required to maintain it. Even better, making a wormery with the kids can be educational and enjoyable.
I hope this article was informative; if you want to learn more about the different types of worms for fishing or how to fish with worms, follow the links!
Steve holds a special place in his heart for the mighty Carp and the elusive Tench
- 5 Best Fishing Bags For Getting Your Gear Organized - January 13, 2025
- 4 Essential Surf Fishing Rigs - January 11, 2025
- How To Know The Sex Of A Fish You Have Caught? - December 9, 2024