Disclosure: Some posts contain affiliate links, which earn us a commission if you make a purchase through them. Positive Fishing © participates in various affiliate networks including the Amazon Services LLC Associates Program.
Most anglers perfect knots through trial and error. Losing fish or precious tackle quickly forces anglers to learn what knots to tie and how to do them perfectly! There are five knots that every fisherman or woman should know how to tie!
Entering the world of knot-tying can be frightening for anglers. Staring at someone on the bank of a lake or river and witnessing them get fully rigged in a few minutes is intimidating. Many anglers know what knots to use and when to use them but forget when they actually go to tie them!
Key Takeaways
- Understand when to use the right knot for the situation
- Learn the proper technique for knot-tying
- Consistency and practice are crucial in perfecting the art of tying knots
In this article, I will cover the five most popular used knots:
- How to tie the Uni Knot
- How to tie the Fisherman’s Knot
- How to tie the Palomar Knot
- How to tie the Surgeon Knot
- How to tie the Snell Knot
What Is A Uni Knot & How To Tie One?
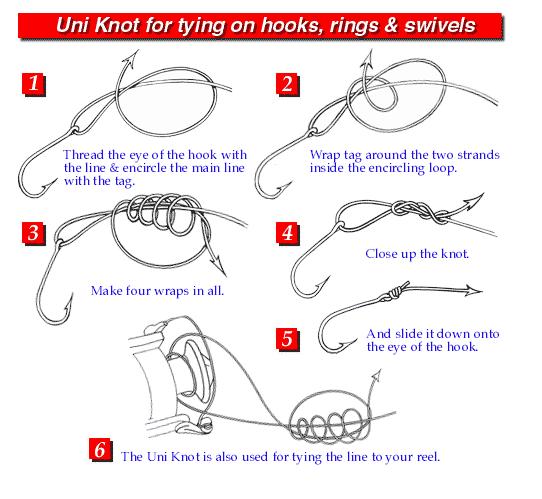
If you’re anything like most people, you forget your left hand from your right hand when tying knots. Thankfully, the Uni knot is quite easy to tie and extremely useful in various situations. It is also known as a Grinner Knot.
It can work on any monofilament to terminal tackle connection. If you’re using a barrel swivel, the Uni is a perfect knot to use. It can also attach hooks, lures, and nearly everything in between.
Here are step-by-step directions on how to tie it:
- Start by placing the line through the eye of the hook and pulling the tag end parallel to the “standing” line or the line attached to your reel’s spool. You’ll want a 10 to 12-inch tag. Hold them tightly together.
- Next, take the top of the tag end of the line and pull it down near the eye of the hook, swivel, etc. It should form a small loop and be doubled near the terminal tackle you’re attaching.
- Take the several inches left of the tag end in your hand. Place the tag end through the loop, around the “standing” line, and the part of your tag end that’s folded into the loop. Run the tag end of the line through the loop four to six times.
- Once you have done this, pull on both sides of the knot to make it tight.
- After it’s tight, you can grab the terminal tackle and the standing end of your line and pull. The knot should slide down and fit snugly up against your terminal tackle!
What Is A Fisherman’s Knot & How To Tie One?
common fishing knots
The fisherman’s knot is one of the first knots most anglers learn. It’s also known as the improved clinch knot. This is the most frequently used knot across all types of fishing worldwide! Plus, it’s one of the easiest knots to teach children.
This is a great knot to attach hooks, flies, and lures to your line.
Here is a step-by-step process on how to tie it:
- Start by running the tag end of your line through the eye of your hook. Make sure your tag is around 8-10 inches long.
- Take the tag end of your line and wrap it around the standing end five to seven times. It helps to lick the line before you do this, allowing it to be maneuvered much more easily.
- Next, take what is left of your tag end and put it through the loop next to your hook’s eye.
- By doing this, you have formed a second loop that includes all the wraps you made.
- Take the tag end of the line in one hand and the hook in the other and pull. You should see the wraps you made slide down the standing end of your line and stack nicely on the top of your hook.
Once you have this, trim the end of your tag end, and you’ll be good to go. It’s an extremely strong knot. If you need more resistance, you may need ten or more wraps.
What Is A Palomar Knot & How To Tie One?

Many anglers will agree that the Palomar knot is best for fishing, period! It’s extremely strong but can easily fail if tied incorrectly. It excels on thinner diameter lines up to 0.018 in / 0.45 mm because it requires the double line to be passed through the eye of the hook.
The Palomar knot is the best option for attaching a line to a hook or a lure. Using this connection, many fly anglers tie their fly to a leader or tippet. However, it excels in other situations as well, such as fishing a ned rig with a braided line,
Here are step-by-step instructions on how to tie the Palomar Knot:
- Like every other knot, start by threading your standing line through the eye of the hook. You’ll need about a 12 to 14-inch tag end.
- Next, you’ll actually thread the line back through the hook eye. Take about six inches of your tag end and put it back through the eye of the hook. You’ll want about six inches of line on both eye sides.
- Do your best not to pinch the line! It will create an unnecessary crease in the line that can be hard to work with. Also, try not to twist the line as you pass it back through the eye of the hook.
- With your line passed correctly through the eye of the hook, you should have about six inches of double line on each side of the eye.
- Now that it’s done properly make an overhand knot. Cross the looped line over the tag line and the standing line.
- Take the looped line underneath both the tag and standing line and pull slightly to form a loose knot. Your hook should be at the bottom of the loose knot.
- Hold the loose overhand knot with your thumb and pointer finger and place the hook through the looped end of the line.
- Once the hook is through the looped line, hold onto it with one hand. Hold the standing and looped lines with your other hand and gently pull.
Remember to wet your line and knots when tying any line and terminal tackle. This will reduce friction and create a solid and strong connection!
What Is A Surgeon Knot & How To Tie One?
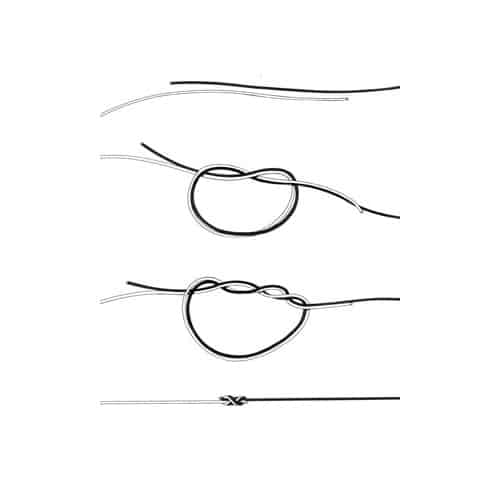
The Palomar knot is more challenging, so let’s follow it up with the surgeon’s knot. This knot is strong and relatively simple. If you want to attach a leader to your line, this is the knot for you. It’s easier than the blood knot and the J Knot.
This knot is also one of the strongest when attaching two lines together.

Here are step-by-step instructions on how to tie the Palomar knot:
- Start by placing your leader and line side by side, overlapping by 5 or 6 inches. This will give you plenty of line to work with as you begin connecting.
- Use both lines to form a loop and tie an overhand knot. Pass the longer end of the leader and the tag end of your standing line through the loop.
- Repeat that exact same step again!
- Wet the lines with your saliva and pull tightly. This will bring both knots together and create an extremely strong connection.
- You are going to be left with two tag ends!
- If fishing with a dropper rig, leave one of the tag ends long to attach a hook. If you aren’t, trim the tag ends so they don’t get caught in vegetation.
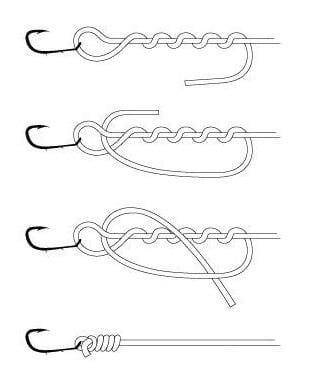
What Is A Snell Knot & How To Tie One?

for tying hooks to line
If you’re specifically tying your hook to the line, then go ahead and use the Snell knot. Finding a knot that connects your hook to your fishing line better than a snell knot is hard. It’s not invasive and quite easy to tie once you get the hang of it.
It’s a common knot if you’re using live bait in saltwater. Also, snelling the hook is the best option if you’re Texas rigging in weedy areas. It can be tied with mono, braid, and even fluorocarbon lines.
Here are step-by-step instructions on how to Snell a hook:
- Run the tag end of your line through the eye of your hook. Ensure you have 4 to 6 inches of tag end to work with.
- Make a small loop with the tag end of your line and hold on to that with the hand holding the hook.
- Take the rest of the tag end of your line and wrap it around the shank of your hook; this will keep your loop in place. If possible, wrap your tag end around the shank of your hook five to seven times.
- Place the rest of your tag through the loop you created.
- Once you have placed it through the loop you have created, pull tightly on the tag and the eye of the hook. This will cinch things very closely together.
- Finally, snip the tag end of the line so no line sticks out
This is a unique knot in that quite a bit of your line is tied around the shank of your hook. Therefore, you don’t want any tag ends sticking out because they’ll likely distract the fish.
Summary
The five common knots covered in this article are the main ones you must know; of course, there are many more. To help tie more consistent knots, you should consider using a knot-tying tool, which is an excellent asset if your eyesight is not as good as it used to be or you have “fat” fingers!
Fishing knots are essential to know. To master knot tying, you must keep practicing. Take a string or spare fishing line and give these knots a try. Prior practice and knowledge will make your interconnections solid and less likely to pull!
I hope you enjoyed reading this article; you can learn more about monofilament, fluorocarbon, and braided lines in my detailed fishing line section.
- Wading Belt Essentials: Ensuring Safer Fishing - January 9, 2024
- Fishing For Catfish (Top Tips, Bait, & Gear To Catch The Big 3) - October 20, 2022
- Fishing Line Strength Vs. Diameter Chart: Why Is It Important? - October 12, 2022