Disclosure: Some posts contain affiliate links, which earn us a commission if you make a purchase through them. Positive Fishing © participates in various affiliate networks including the Amazon Services LLC Associates Program.
Fishing from a pier makes catching saltwater species both very convenient and much more affordable.
You can cast your baits into waters that you could only access with a boat but without the costs of owning or chartering one. All you have to do is walk to the end of the pier and cast, and it’s so easy.
Piers also create a structural habitat that fish like to hang out around. So, not only is it easy, but fishing around a pier is also a great place to catch fish.
Join me as I run through everything you need to know about how to fish from a pier so that you can enjoy catching fish whenever you have a free hour or two to spare.
Step 1: Choose What Species You Want To Catch From The Pier
Good research is the key to catching fish, especially in the sea when there are so many species on offer. Wherever in the world you live, there will be plenty of information about the species of fish that call your waters home.
Learn about the fish species that live in your area, when they migrate past, what they like to eat, and what depth of water they like to feed in.
Once you have this information, you can change your tactics and target species depending on the time of year, time of day, tide, bait, and the gear you need to use.
Step 2: Understanding Tides, Weather, & When To Fish The Pier
When you are inshore fishing, tides dictate the movement of every fish close to the shore, and you need to get dialed into them.
Generally speaking, smaller baitfish use the shallows to protect themselves from larger predatory fish. At high tide, the baitfish move closer to the shore; at lower tide, they are sucked out into the deep.
Large predatory fish know this and will wait for small fish in deeper waters as the tide is dropping, picking them off as the water sucks them past.
At high tide, predators generally move in, with the tide catching up to bait that is moving shallower and shallower.
Weather is also a factor, so check your barometer before you head out. Hot days in winter equal good fishing during the day as the water heats up. Cool mornings and evenings in summer are great times to fish as the predators become more active as the water temperatures cool down.
Tides also affect water temperature. An incoming tide brings cool water (great on hot days), while a slow dropping tide allows shallow waters to heat up (great on cold days).
In warmer parts of the world, night fishing can be very effective from a pier. Baitfish tend to congregate around lights, so the predators do too!
Step 3: Look For Structure & Depth Changes At Low Tide
Fish like to hang out around depth changes and structures. Finding where these are around the pier is key to catching fish.
Check the tide charts and look for the lowest spring tide. Get to the pier an hour before dead low tide and draw a map of the structures you see. Rocks, large troughs, drop-offs, and weed patches are all worth adding to your map.
Your map will be incredibly useful in showing you where to cast when it is high tide, and you can not see anything.
It might also be worth looking at the charts of the area around the pier as it will show all the different depths and the depth changes that are worth casting to.
The pier is an excellent structure in itself, so dropping a line straight down is always worth a shot, too. You should also keep an eye out for birds diving on the surface, as it is a sure sign of fish activity.
Step 4: Learn The Rules Of Pier Fishing
In most parts of the world, there are fishing rules to follow. Make sure you have the right fishing license for pier fishing, and find out the size and catch limits for the species you might catch.
The pier itself may have fishing rules, such as the number of rods you may use. There could be a fishing fee along with a pier entrance fee to pay.
Pier fishing etiquette should also be followed. Do not fish too close to someone else or cast your bait too close to theirs.
If someone has hooked a fish, do not get in the way and actively move your gear around to help them land it – you would want them to do the same for you.
Keep the area around you clean and safe. No hooks or knives on the floor, no bait or fish on the floor. Use a tackle box and a bucket. Make sure to clean up before you leave.
Step 5: Choose The Right Bait or Lures
Spending some time in the local tackle shop is the best way to learn about what bait is best to use. Where there is a pier, there is never a bait shop far away, and some are even on the pier.
Look at what bait is for sale, ask the staff what bait they use for certain species, and follow their advice.
Look at the bait other anglers on the pier are fishing with. Keep tabs on what they catch, and you will learn what fish like which bait.
Great baits include squid, worms, shrimp, pilchards, sardines, and anchovies. Most of these baits are easily available from your local supermarket.
Lures are also a good option for predatory fish. Generally, spoons, spinners, and crankbaits like rapalas are excellent choices. Make sure the lure weight is correct for your rod, and remember, you can cast heavier lures further.
Step 6: Take Two Rod Outfits With The Right Setup
It is best to bring two different rod and reel setups when fishing from a pier so that you can fish in two different areas at once.
You want one shorter rod around 7 ft long that is strong, which is ideal for dropping your bait right by the pier.
The other rod should be about 9 to 10 feet long. The extra length allows you to cast great distances and get your bait next to structures and depth changes you have found in your research at low tide and in the charts.
Make sure you are fishing with at least a 30 lb line so that you can stop fish from running into the pier and handle the long runs of bigger species.
Step 7: Extra Gear You Should Take To The Pier
Bring a tackle hauler with wheels to carry all your things with. Between your bait, lures, hooks, sinkers, knife, and pliers, a hauler will make it much easier to get all your things to the end of a pier.
Polarized sunglasses are also a must. They protect your eyes and allow you to see through the water and spot fish.
A bucket for your bait is also important, and if you are using live bait, a bucket with a battery-powered aerator is a must. A Frabill Magnum bait station is an ideal choice, as it keeps the water oxygenated so your bait does not die.
A pier net is a must have bit of pier fishing gear. It lets you land your catch without breaking your rod, line, or hurting fish. Never ever try to land your fish by pulling it up by the line or with your rod.
How To Use A Pier Net
Using a pier net is easy; however, it takes some time to get the hang of. A pier net is a normal net, but it is attached to a rope by three lines that let it drop openly into the water. These inexpensive nets, such as the Weisgja fishing net, are portable and foldable, and can be used for landing fish, prawns, and crabs.
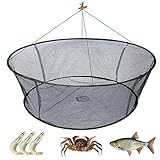
The idea is to lower your pier net into the water until it is just beneath the surface. Once set, you should guide the fish above your pier net and then haul it up quickly, removing the fish safely from the water.
You can then safely remove the hook and release the fish or take it home so long as it is within the size and catch limit of the rules and regulations.
Netting Out
Pier fishing is a popular style of fishing and can be a great way to spend a few hours fishing and socializing.
Ensure that you follow the rules and keep safe. With multiple species available throughout the year, it can be a fun and rewarding angling experience.
Steve holds a special place in his heart for the mighty Carp and the elusive Tench
- 5 Best Fishing Bags For Getting Your Gear Organized - January 13, 2025
- 4 Essential Surf Fishing Rigs - January 11, 2025
- How To Know The Sex Of A Fish You Have Caught? - December 9, 2024