Disclosure: Some posts contain affiliate links, which earn us a commission if you make a purchase through them. Positive Fishing © participates in various affiliate networks including the Amazon Services LLC Associates Program.
For the purists in the world of fishing, technology can be seen as a crutch or a way of cheating. Satellite fishing maps can assist anglers in finding fish and provide a massive advantage, but all anglers should use these aspects of the 21st century.
Google Maps and Google Earth are tools that offer a big advantage to fishermen and boat charters, but they are not going to show you how many fish and the types of fish lurk beneath the surface.
However, it is going to show you great places to cast a line and how to access them, and it will even show you an area that few anglers have ever fished.
In this article, I will cover:
- How to Use Google Maps for Fishing
- What to Look for when Trying to Find Fishing Spots
- Things to Avoid When Fishing Via Google Maps
How Does Google Earth Help Find The Best Fishing Spots?
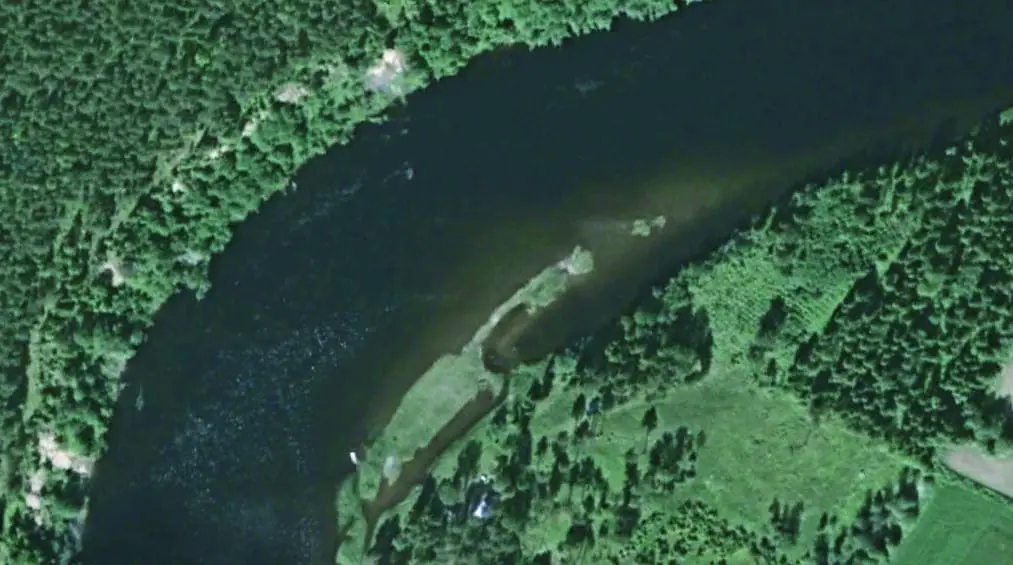
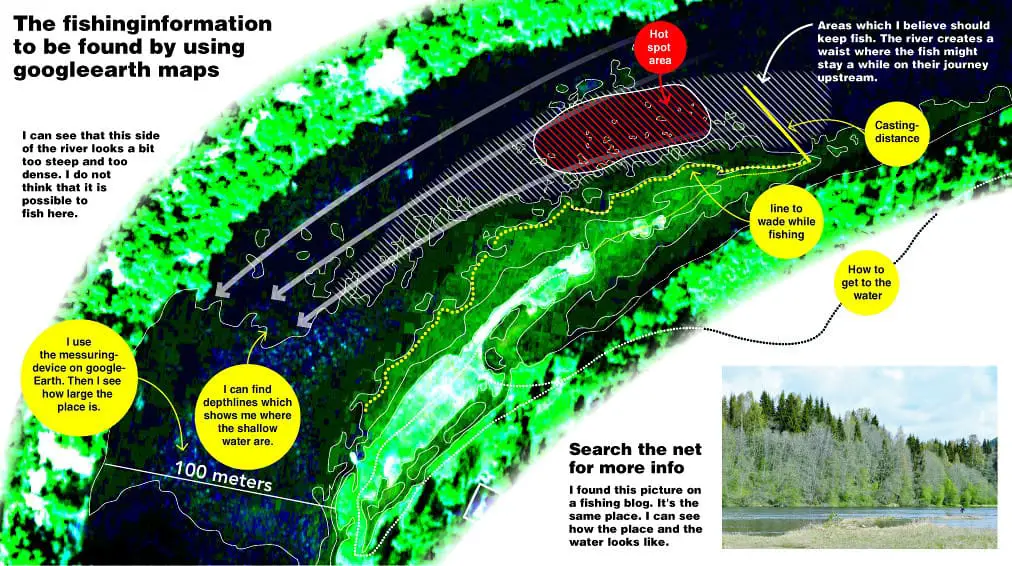
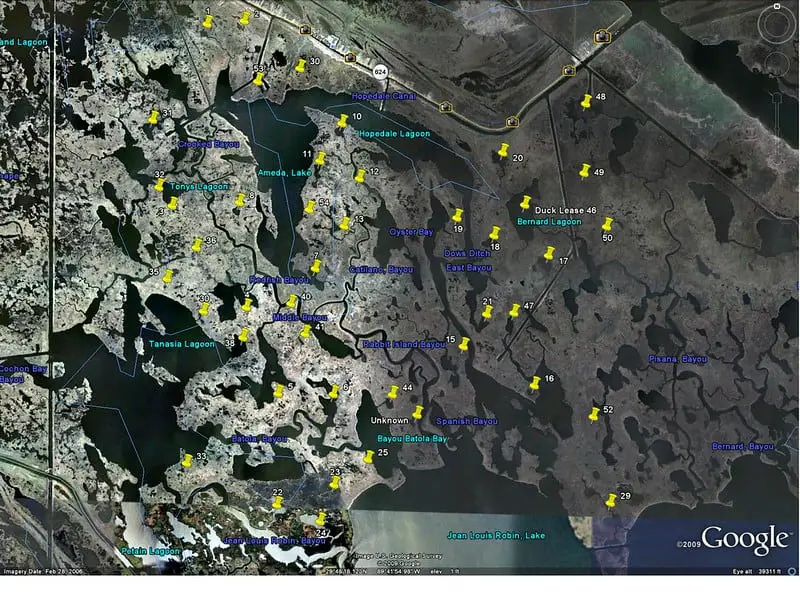
This diagram shows how it is possible to map out a specific area in detail to establish the best fish-holding spots, where it’s safe to wade. Image courtesy of the official Visit Sweden website.
Google Maps will help you find inshore locations whether they are close to the shore or within a short boat ride.
It gives locations of boats that are much further from the shore and where the saltwater captains are taking their boats for the best fishing for the period of time.
It will allow you to locate the current fishing hot spots. Best areas change quickly due to many factors, weather, wind, currents, and tides. Google Maps will pinpoint where the skippers are going out and also what time of the day.
Tip: I strongly suggest that you first use it over the usual fishing spots you already know. This makes it easier to figure out and compare new areas.
It’s great for finding grassy or even rocky drop-offs on the flats. I have found holes, cuts, and flat bars on the flats.
How to Use Google Maps for Fishing
If you’re unfamiliar with Google Maps because you’re more of a traditionalist and prefer old-school maps, there are a few aspects of it that you’ll want to know when you begin to search for your next fishing location.
Different Types of Map Views
On Google Maps, you’ll find a few different types of maps that you can view. Depending on what you’re wanting, all three of the types are useful.
You’ll have a transit viewpoint and a satellite viewpoint. Within those layers, you have a few other options. You have terrain, wildfires, and a street view.
Transit View
If you’re solely looking to locate bodies of water, it’s best to stay in the transit viewpoint. The contrast of colors allows you to see the blue lines or large blue circles that showcase the rivers and lakes you might want to fish. On top of the easily identifiable blue that is the water, you can also see what roads and trails run along the rivers or around the lakes.
You can see if there are any easy access points or other features that will make your life a bit easier when you’re hoping to land some fish.
The transit option shows you large green areas that comprise national parks or forests. These large green areas with water inside them are always a good sign. Odds are there are access points and great areas to fish!
No matter how big or small of water you want to fish, they provide solid details that are going to show you creeks, streams, rivers, and lakes.
The downside of the transit view is that you receive no details on the water. You don’t know how deep it is or even if it’s fishable at all. However, if you’re only looking to locate water and see if there are any access points, then go ahead and use the transit option.
Satellite View
You also have the option to switch your Google Maps to satellite mode. You should switch to Satellite mode once you have used Transit mode and located a few areas that interest you and you’re hoping to fish.
Satellite mode shows you everything from the terrain to tree lines and even small forest roads. It can be overwhelming, so make sure you have a bit of a plan before you begin looking for where to fish.
Street View
If you want to fish besides a road, then switch Google Maps to Street View.
Recently, the street view option has improved tremendously.
It is capable of finding:
- Beach areas
- Jetties
- Piers
- Walking trails
You’ll essentially be able to drive the road before you do it yourself. By driving the road, you’re able to see the terrain that surrounds the water. You may be able to identify steep cliffs or challenging access points that you may not have found before.
To use Street View, an arrow will point to a small man figure – just click and drag the small man and put him over the area where you see a blue line or dot.
This gives great options now to locate:
- Boat launch areas
- Wading areas for fishing close to the shore
- And if you need detailed information, it can even read street signs to show if an area is off limits to fishing
- Changes in water heights, such as flood areas or drought conditions
Of course, you can go to the official site at google.com/maps/ to check these features out.
Best Tips When Trying to Find Fishing Spots
It can be used to locate areas like points, inlets, river/creek mouths, etc. However, it won’t show underwater structure, depth, salinity, water temperature, or tidal flows. So focus on the key elements such as holes, ridges, and even shipwrecks!
It’s easy to get caught up in looking at unnecessary details when you’re searching Google Maps.
There are quite a few things that can throw you off or confuse you, so make sure you stay focused on what you need. That’s why having a plan is important when you begin searching.
Focus On a Location Where You Plan To Fish
When you’re beginning to plan your excursion, start by choosing the location that interests you most. Whether you’re on a trip and can’t travel too far or you have a specific area you want to fish, give yourself a specific location you want to fish, and then you can start looking at the water.
If you’re fishing in an area with quite a bit of water to choose from, then it’s smart to do some other research on what bodies of water are working and where you will be more successful.
For example, a fly angler fishing near Crested Butte, Colorado, is going to have several different rivers to choose from, so it’s smart to know what rivers are the most productive before you truly start doing your research.
Once you have chosen your body or a couple of bodies of water, you can truly narrow in on locations and see what the water is like.
Tip: What I find the best about satellite maps is to use Google Maps to mark all your fishing spots, species caught, and other comments on methods or conditions. Then you have a historical record recorded for future trips.
Study the Water
You’ll be shocked at how much information you can gather about a body of water on Google Maps. If you’re looking at a river, you want to see a couple of things before you decide to fish it.
First, you’ll want to find rapids and pools. You can zoom in a long way on rivers, which will easily allow you to see where these parts of the water are located.
It’s also smart to look for bends in the river. These are otherwise known as eddies and almost always produce fish.
If you’re fishing lakes, do your best to study the shoreline. Depending on when the lake was photographed, you’ll be able to see the bottom of the lake, giving you almost all the information you need.
In lakes, you want to find rocky points and any drop-offs. Rocks are great homes for fish. If you can find where they end, you’ll find fish.
Drop-offs are also prime locations for fish. This will require you to use some sort of boat to get to the edge of a drop-off.
Getting this prep work done before you make your trip will minimize the amount of time you search while on the water. You’ll know what areas to avoid and what areas to focus on as you fish.
Drop Pins
Once you’ve located specific areas that you want to fish, it’s time to drop pins so you can locate them when you head to the water.
To drop a pin, all you need to do is hold your finger down the screen where you would like to save, and you’ll see a red pin drop exactly where you need it.
Once it’s dropped, click save and label it whatever you want. This pin will stay saved if you keep your phone or tablet. You do your research on the front end, and you’ll have your spots as long as you need.
Look for Fishing Boats
When looking at the satellite map and studying bodies of water, it’s not uncommon to see satellite pictures of boats. This is usually a good sign. A cluster of boats on a lake is enough of a hint that that part of the lake produces fish!
If you know you’ll spend time on a popular lake, you’ll likely see several boats photographed. Signs of boats and anglers fishing on a lake together should give you confidence that things will be productive.
Things to Avoid When Fishing Via Google Maps
While they have many great features that help anglers find fish, it also can cause problems or not always provide accurate information. There are definitely things to avoid when you’re in the midst of searching.
Know your Abilities
If you’re planning a trip to a remote area, it’s easy to overestimate your ability to travel. For example, you may see a stretch of river that looks phenomenal, and you may even see a dirt road that could get you somewhat near where you would like to fish.
This doesn’t necessarily mean it’s always accessible and can be concerning or dangerous. If no landmarks are nearby, it may be smart to do some extra research.
You don’t want to be stranded on a forest road due to overestimating your abilities. At times, these risks can definitely pay off, but you also may find yourself in a situation where you aren’t quite sure how to recover.
Understand the Topography
If you’re looking to fish mountain alpine lakes or rivers, make sure you have the topography settings turned on to see what sort of elevation gain or loss you’ll be fishing.
Water is often going to be located at extremely low points. Rivers flowing through canyons don’t always show up, so be sure to do some outside research to know you won’t have to be climbing thousands of feet to find your preferred destination.
Know the Regulations
If you’re fishing water located near a more populated area, there will likely be regulations you’ll have to follow. For example, a lake you want might be located in a gated area, or it all says no fishing.
These are things that are nice to know before you plan an entire day around a body of water.
Search the name of the river or lake, and you’ll quickly be able to find information about whether or not it’s legal to fish!
Final Thoughts
Using this Google map technology for areas outside your normal fishing haunts is a great advantage for the tech-savvy fisherman.
When going on a road trip somewhere new or unfamiliar with your normal fishing spots, this is the time to use satellite fishing maps to save a lot of time. It will help you get more chances to land the fish you’re targeting.
Finally, for those anglers who fish in urban areas and go street fishing, these maps provide all the information you need to locate the accessible areas in cities such as Amsterdam, London, and every US city.
- Wading Belt Essentials: Ensuring Safer Fishing - January 9, 2024
- Fishing For Catfish (Top Tips, Bait, & Gear To Catch The Big 3) - October 20, 2022
- Fishing Line Strength Vs. Diameter Chart: Why Is It Important? - October 12, 2022